Currently Empty: £0.00

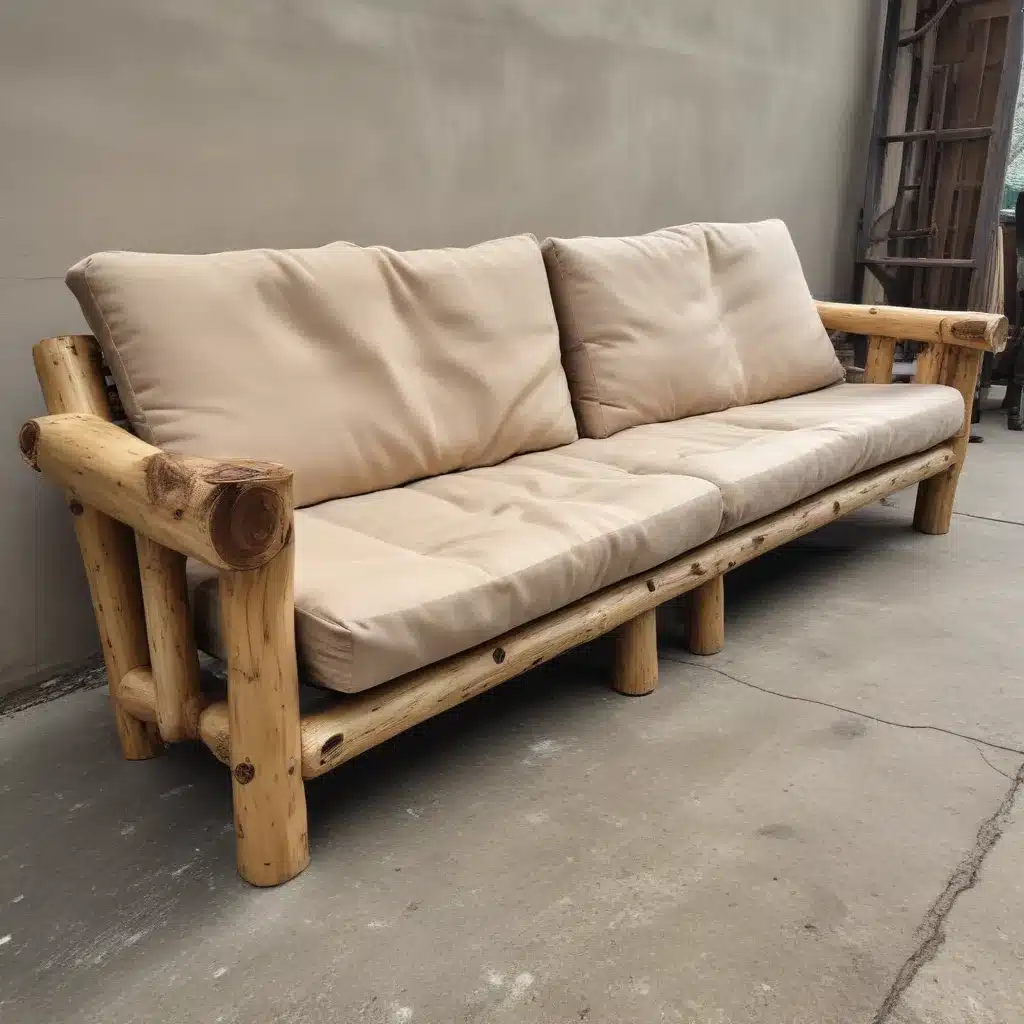
As a furniture specialist with years of experience, I’ve seen countless sofa designs come and go. But there’s something truly special about a handcrafted log sofa that brings the warmth of nature into your living space. Today, I’m excited to share my insights on creating a rustic masterpiece that will become the centerpiece of your home.
The Appeal of Log Furniture
Log furniture has a timeless appeal that resonates with those who appreciate natural aesthetics and sustainable living. When I first encountered a log sofa, I was struck by its raw beauty and the way it seemed to bring the outdoors inside. There’s an undeniable charm in the rough textures and organic shapes that simply can’t be replicated by mass-produced furniture.
The beauty of log furniture lies in its uniqueness. No two pieces are exactly alike, as each log has its own character, knots, and grain patterns. This individuality ensures that your log sofa will be a one-of-a-kind creation, reflecting your personal style and connection to nature.
Moreover, log furniture is incredibly durable. I’ve seen log sofas that have been in families for generations, each year adding to their patina and story. The solid construction means these pieces can withstand the test of time, often becoming cherished heirlooms passed down through families.
Selecting the Right Logs
Choosing the right logs is crucial for creating a sturdy and beautiful log sofa. In my experience, hardwoods like oak, maple, or cedar are excellent choices due to their durability and resistance to decay. However, softwoods like pine can also be used if properly treated and maintained.
When selecting logs, look for:
- Straight pieces: These will make construction easier and ensure a more stable frame.
- Consistent diameter: Aim for logs with similar diameters to create a balanced look.
- Minimal defects: While some knots and imperfections add character, avoid logs with large cracks or signs of rot.
- Properly seasoned wood: Logs should be dried for at least 6-12 months to prevent warping or cracking after construction.
I once worked on a project where we used freshly cut logs, and the result was disastrous. The wood continued to dry and shrink after the sofa was built, leading to gaps and an unstable structure. Learn from my mistake and ensure your logs are well-seasoned before you begin.
Tools and Materials
Before you start, gather the necessary tools and materials. Here’s a list of essentials based on my experience:
- Chainsaw or handsaw
- Drill and drill bits
- Chisels
- Sandpaper (various grits)
- Wood preservative
- Screws and bolts
- Comfortable cushions or upholstery materials
- Safety equipment (goggles, gloves, ear protection)
Remember, safety should always be your top priority. I’ve seen too many DIY enthusiasts rush into projects without proper protection. Take the time to gear up properly – your fingers and eyes will thank you!
Designing Your Log Sofa
The design phase is where you can let your creativity shine. I always recommend sketching out your ideas before starting. Consider the following aspects:
-
Size and scale: Measure your space carefully. A log sofa tends to be bulkier than traditional sofas, so ensure it fits comfortably in your room.
-
Arm style: Do you want curved or straight arms? Each style has its own charm and difficulty level.
-
Back design: A simple straight back is easiest, but a curved or angled back can add visual interest.
-
Base structure: Will you use log sections as legs or create a more complex base?
-
Cushion style: Think about whether you want removable cushions or a more built-in look.
I once designed a log sofa with a gentle curve in the back, mimicking the natural bend of a tree. It was challenging to execute but resulted in an incredibly comfortable and visually striking piece.
Construction Process
Now, let’s dive into the construction process. This is where patience and attention to detail really pay off.
Preparing the Logs
Start by debarking your logs if they haven’t been processed already. This can be done with a drawknife or bark spud. I find this step oddly satisfying – there’s something therapeutic about revealing the beautiful grain beneath the bark.
Next, sand the logs to remove any rough spots. Start with coarse-grit sandpaper and work your way to finer grits for a smooth finish. Don’t aim for perfection; some texture adds to the rustic charm.
Creating the Frame
The frame is the backbone of your sofa. Begin by cutting your logs to the desired lengths for the seat, back, and arms. For a standard three-seater sofa, I typically use:
- Two 6-foot logs for the front and back of the seat
- Two 3-foot logs for the sides
- Four 2-foot sections for the legs
- Two 4-foot logs for the armrests
- Three 3-foot logs for the backrest
Notch the logs where they will intersect to create strong, stable joints. This is where your chiseling skills come into play. Take your time with this step – good joints are crucial for the sofa’s structural integrity.
Assembling the Base
Start by assembling the seat frame. Join the front, back, and side logs using your notches and secure them with screws or bolts. Attach the legs, ensuring they’re level and sturdy.
I remember one project where I rushed this step and ended up with a wobbly sofa. Trust me, it’s worth taking the extra time to double-check your measurements and ensure everything is square and level.
Adding the Back and Arms
Attach the backrest logs to the seat frame. You may need to use angled cuts to achieve the desired recline. The armrests can be attached to the seat and backrest, creating a cohesive structure.
This is where your design really comes to life. I always feel a sense of accomplishment when the basic structure starts taking shape.
Finishing Touches
Apply a wood preservative to protect your sofa from moisture and insects. This is especially important if the sofa will be used outdoors or in a humid environment.
Sand any rough edges for comfort and safety. Pay special attention to areas where people will be sitting or resting their arms.
Upholstery and Cushions
The choice of upholstery can dramatically change the look of your log sofa. Here are some options to consider:
- Leather: Durable and easy to clean, leather complements the rustic look beautifully.
- Wool: Warm and cozy, perfect for a cabin or mountain home.
- Canvas: Sturdy and casual, great for outdoor use.
- Faux fur: Adds a touch of luxury and warmth.
When selecting cushions, opt for high-density foam for the seat to ensure comfort and longevity. Back cushions can be softer for a cozy feel.
I once created cushions using a patchwork of different textured fabrics in earth tones. The result was a unique, bohemian look that the client absolutely loved.
Maintenance and Care
Proper maintenance will ensure your log sofa lasts for years to come. Here are some tips:
- Regularly dust and vacuum to prevent dirt buildup.
- Check for signs of insect infestation or moisture damage.
- Re-apply wood preservative every few years, especially for outdoor sofas.
- Rotate cushions regularly to ensure even wear.
I’ve seen well-maintained log sofas that look better after decades of use than some modern sofas do after just a few years. With the right care, your DIY creation can truly stand the test of time.
Styling Your Log Sofa
Once your sofa is complete, it’s time to style it within your space. Here are some ideas:
- Throw pillows: Add color and texture with pillows in complementary fabrics.
- Blankets: Drape a cozy throw over the back for added comfort and style.
- Side tables: Pair your sofa with rustic side tables made from stumps or live-edge wood.
- Lighting: Soft, warm lighting from table lamps or floor lamps can enhance the cozy feel.
Remember, your log sofa is a statement piece. Let it shine by keeping the surrounding decor simple and complementary.
Conclusion
Creating a DIY log sofa is a rewarding project that allows you to bring a piece of nature into your home. It requires patience, skill, and creativity, but the result is a unique, sturdy piece of furniture that tells a story.
As you embark on this project, remember that perfection isn’t the goal. Each imperfection adds character and makes your sofa truly one-of-a-kind. Embrace the process, learn from any mistakes, and enjoy the satisfaction of crafting something with your own hands.
Whether you’re furnishing a cozy cabin or adding a rustic touch to a modern home, a log sofa is sure to become a cherished centerpiece. So grab your tools, find some beautiful logs, and let your creativity flow. Happy crafting!
For more inspiration and expert advice on all things sofa-related, don’t forget to check out Sofa Spectacular. We’re here to help you create the perfect living space, one sofa at a time.

