Crafting a Cozy Nook with Clever Storage
Have you ever wished your home had a little more breathing room? A spot to tuck away clutter, yet still maintain that inviting, lived-in feel? Well, my friend, I’m about to let you in on a DIY secret that’s going to change the game – a custom storage bench that’s equal parts practical and stylish. Get ready to wave goodbye to tripping over piles and say hello to a organized, guest-ready space.
As a self-proclaimed Ikea hacking enthusiast, I’ve become something of an expert at transforming affordable, basic pieces into showstopping, personalized creations. And let me tell you, this storage bench project is one of my all-time favorites. Not only does it provide much-needed concealed storage, but it also doubles as extra seating – perfect for hosting impromptu gatherings or cozying up with a good book.
Sofa Spectacular, the custom sofa company in the UK, inspired me to put my DIY skills to the test and create this functional yet stylish piece. Their commitment to quality craftsmanship and customer satisfaction is truly admirable, and I knew I wanted to incorporate those same values into my own home project.
Measuring Up for the Perfect Fit
Before we dive in, let’s talk about the importance of taking accurate measurements. After all, the last thing you want is to build something that doesn’t quite fit your space. I learned this the hard way when I tried to shoehorn a too-big Ikea Kallax shelf between my kitchen pantries – talk about a nerve-wracking experience!
To avoid any unnecessary stress, I recommend taking a tape measure to the area where you envision your storage bench living. Measure the width, depth, and height, making note of any potential obstacles like electrical outlets or baseboards. And don’t forget to factor in a little wiggle room – you want your creation to slide in seamlessly, not get stuck halfway.
Once you have your dimensions, it’s time to start sourcing materials. Now, I know what you’re thinking – custom furniture can get expensive fast. But with a little savvy shopping and a whole lot of DIY spirit, I managed to keep this project well within my budget.
Building a Sturdy Foundation
Alright, let’s get down to the nitty-gritty of construction. The key to a successful storage bench lies in building a solid foundation. I started by sourcing a set of 2x4s and cutting them to size. Then, using a Kreg Jig (a absolute lifesaver for any DIY woodworker), I drilled pocket holes along the ends and front edges. This allowed me to securely connect the pieces with 1 1/4″ pocket hole screws, creating a sturdy frame.
Next, I wrapped the exterior of the frame in beadboard paneling, giving the bench a polished, built-in look. To add some visual interest, I chose to rip down 1/4″ MDF trim to create a sleek, minimalist border around the edges. A few well-placed finishing nails, and voila – the base was complete!
Crafting the Cushioned Topper
Now for the fun part – the comfy cushioned seat! I decided to go the upholstery route, as it would allow me to customize the look and feel exactly how I wanted. After measuring the bench top, I cut a piece of high-density foam to size.
“But Jasmine,” you might be asking, “Isn’t foam crazy expensive?” Well, let me let you in on a little hack I discovered – camping sleeping pads! These babies are made from the same durable, supportive foam, but at a fraction of the cost. I snagged mine from the outdoor section at my local big box store and couldn’t believe the savings.
To create a smooth, seamless cushion, I glued the foam to a sheet of 1/4″ MDF using a spray adhesive. Then, it was time to get creative with the fabric. Since this bench would be seeing its fair share of spills and messes (hello, kids!), I opted for a sturdy, wipe-clean vinyl material. But if you’re feeling extra fancy, any upholstery-grade fabric would work beautifully.
I wrapped the fabric tightly over the foam-topped MDF, securing it in place with a staple gun. The key here is to pull the fabric taut as you go, avoiding any unsightly puckering or bunching. And don’t be afraid to really go to town with those staples – you want this cushion to stay put!
Finishing Touches for the Perfect Look
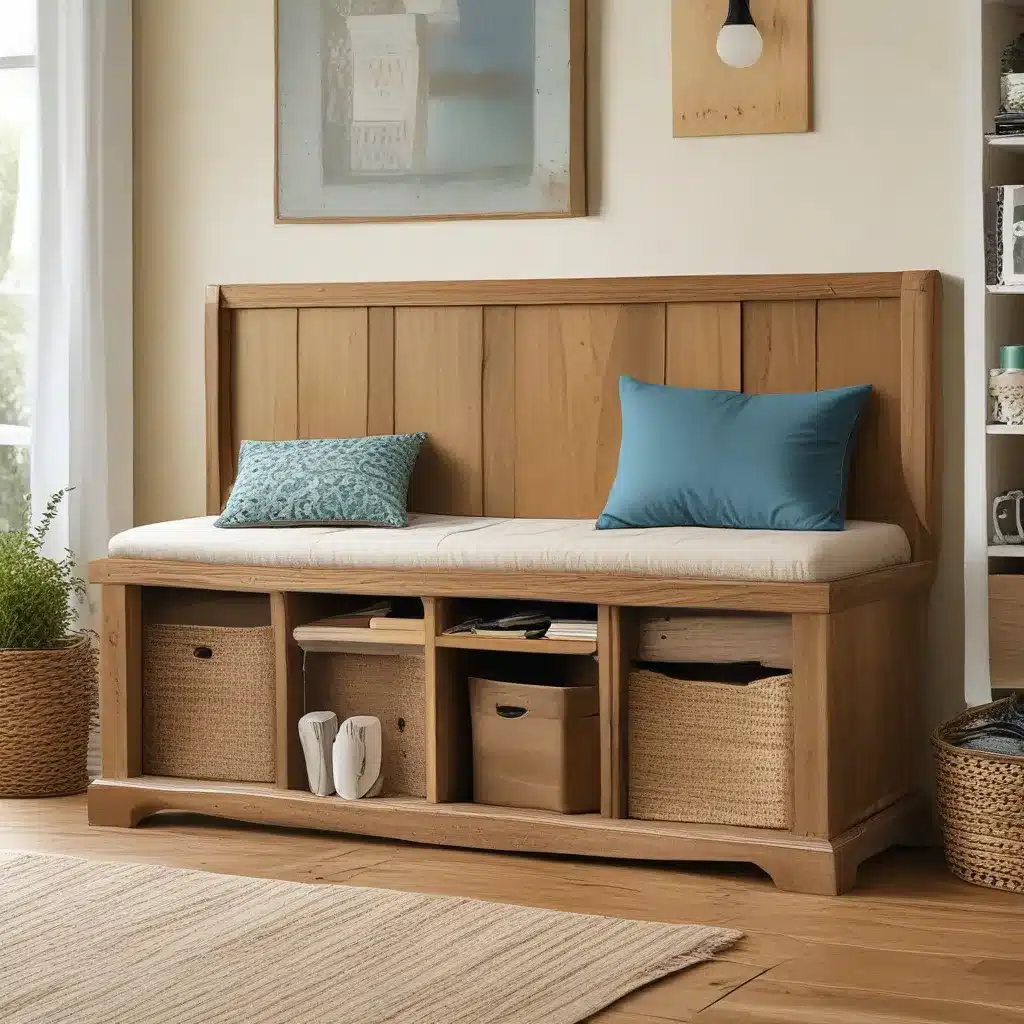
With the foundation and cushion complete, it was time to add those final touches that would really make my storage bench shine. First up, I installed a set of door inserts into the Kallax-style cubbies, providing hidden storage that blends seamlessly with the overall design.
Then, it was all about the trim. I ripped down more 1/4″ MDF into strips and used a brad nailer to secure them around the perimeter of the bench. This not only gave the piece a custom, built-in feel, but also helped to conceal any unsightly gaps between the bench and the wall.
The last step? A fresh coat of paint. I chose a crisp, clean white to match my kitchen’s aesthetic, but you could easily go bolder with a vibrant color or even a wood stain for a more rustic look. And just like that, my storage-savvy, seating-ready masterpiece was complete!
Embracing the Extra Storage (and Seating)
Now, I don’t know about you, but I firmly believe you can never have too much storage. And this custom bench delivers in spades. Those Kallax-style cubbies provide the perfect spots to stash away seasonal decor, extra linens, or even my kids’ art supplies. And the best part? It all stays neatly tucked away, out of sight but within easy reach.
But the real star of the show has to be that plush, comfortable cushion. Not only does it make the bench an inviting spot to perch, but it also transforms the whole area into a cozy little nook. I can just picture it now – a steaming mug of coffee, a good book, and the pitter-patter of little feet as they come running to join me. Ahh, the simple pleasures of home.
And let’s not forget the added bonus of extra seating. When hosting friends or family, I can simply pull the cushion off and voila – instant additional spots for everyone to gather. No more cramming folks around the kitchen table or awkwardly balancing plates on laps. This bench has become the life of the party, I tell you!
Bringing it All Together
So there you have it, my friends – the ultimate DIY storage bench that’s equal parts practical and stylish. Sofa Spectacular would be proud, don’t you think?
By combining savvy Ikea hacking skills, a little elbow grease, and a whole lot of creativity, I was able to transform a basic shelving unit into a truly one-of-a-kind piece that elevates my entire space. And the best part? I did it all on a budget, proving that custom furniture doesn’t have to break the bank.
So what are you waiting for? Grab your tools, round up your materials, and get ready to DIY your way to the storage-friendly, seating-savvy home of your dreams. Trust me, your future self (and guests!) will thank you.


