The Joy of DIY Woodworking
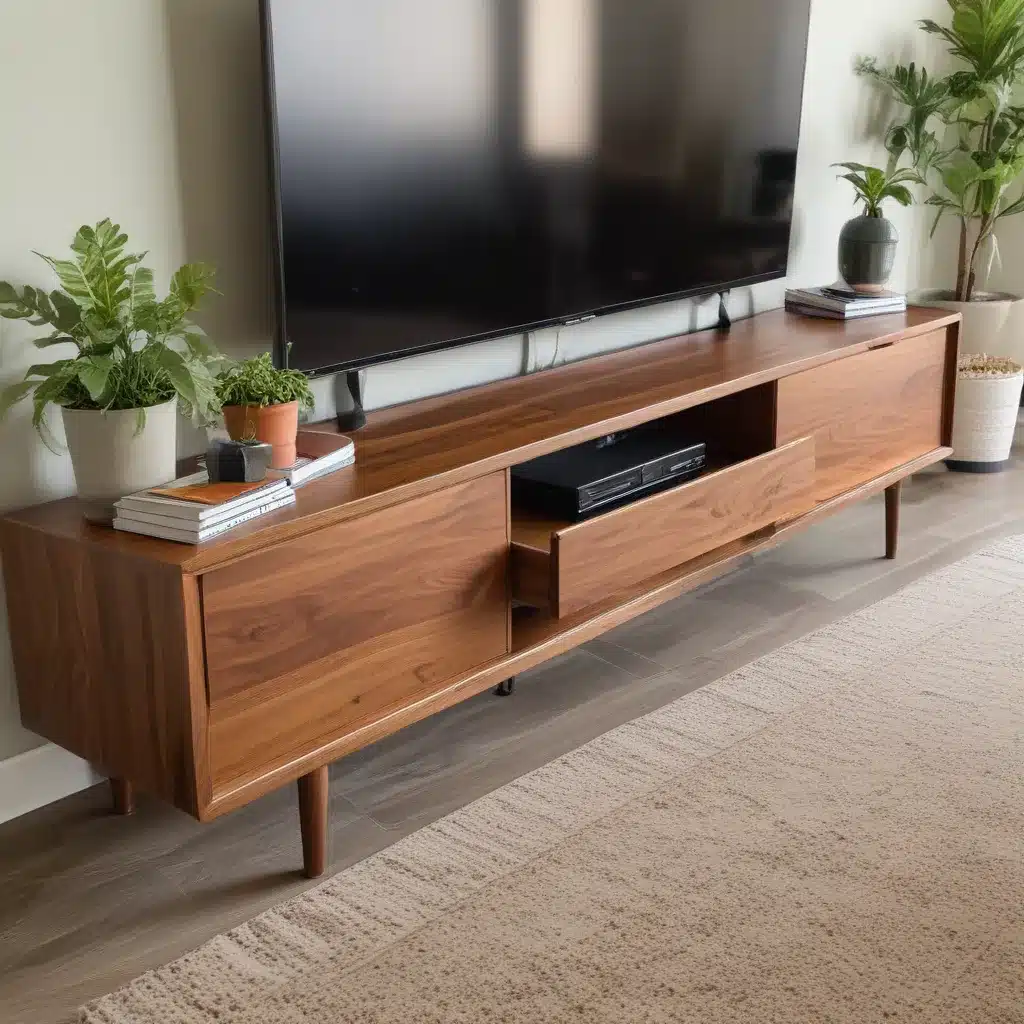
Ah, the sweet smell of freshly sanded wood, the gentle hum of power tools, and the sense of accomplishment that comes from creating something with your own two hands – welcome to the world of DIY woodworking! As a long-time devotee of this rewarding hobby, I can attest to the pure joy it brings. And today, I’m thrilled to share with you a project that’s near and dear to my heart: building a modern media console with a stunning walnut stain.
Now, I know what you might be thinking – “Woodworking? That’s way out of my league!” But hear me out, my friends. With the right guidance and a little elbow grease, even the most novice of DIYers can transform a few simple materials into a statement piece that will have your guests swooning. And the best part? You get to bask in the glory of your own handiwork, without breaking the bank.
So, grab your tool belt, put on your safety goggles, and let’s dive into the world of custom furniture-making. Trust me, by the time you’re done, you’ll be wondering why you didn’t start sooner.
Introducing the Modern Media Console
Picture this: a sleek, minimalist console that seamlessly blends form and function, providing ample storage and display space for all your media equipment. With its clean lines, floating shelves, and rich walnut stain, this media console is the perfect addition to any modern living room.
But why stop at just a media console? This versatile piece can be so much more. Imagine using it as a stunning sideboard in your dining room, a stylish entry table in your foyer, or even a chic display unit in your home office. The possibilities are endless, my friends.
And the best part? You get to call the shots. Whether you opt for a classic rectangular shape or a more unique asymmetrical design, the choice is entirely yours. With a little bit of planning and a lot of creativity, you can craft a media console that’s truly one-of-a-kind, tailored to your personal style and the needs of your space.
So, what are you waiting for? Let’s get started on building your very own modern media console with a luxurious walnut stain.
Gathering Your Supplies
Before we dive into the nitty-gritty of the build, let’s make sure we have all the necessary supplies on hand. After all, nothing puts a damper on a DIY project quite like a last-minute trip to the hardware store.
First and foremost, you’ll need the following materials:
– 2 IKEA SEKTION wall cabinets (or similar)
– 4 IKEA SEKTION cabinet doors
– 1 pre-cut wood top, either from IKEA or your local hardware store
– Walnut wood stain
– Wood glue
– Screws and wall anchors
– Power tools (a drill, a saw, and a sander, at a minimum)
Now, I know what you’re thinking – IKEA cabinets? Really? But hear me out. These sturdy, modular units provide the perfect foundation for our modern media console. Plus, with a little bit of customization and that gorgeous walnut stain, you’ll never know they came from a big-box store.
According to the Reddit community, the IKEA SEKTION cabinets come in a variety of sizes, so you can easily find the right fit for your space. And with the addition of some well-placed suspension rails, you can achieve that coveted “floating” look that’s all the rage these days.
But the real star of the show is the walnut stain. As the team at Petite Modern Life discovered, this rich, chocolatey hue adds an instant dose of luxe to any DIY project. Plus, it pairs beautifully with the clean lines and minimalist design of our modern media console.
So, gather up your supplies, grab a cup of coffee (or a glass of wine, if that’s more your speed), and let’s get started on this exciting project.
Assembling the Cabinets
Alright, let’s dive in! The first step in our modern media console journey is to assemble those trusty IKEA cabinets. Now, I know IKEA instructions can sometimes feel like they’re written in a foreign language, but trust me, you’ve got this.
Start by carefully unpacking the cabinet components and laying them out on a clean, flat surface. Double-check that you have all the necessary pieces, and then follow the step-by-step instructions like a pro. Remember, take your time and don’t be afraid to ask for a second opinion if you get stuck.
Once the cabinets are assembled, it’s time to tackle the tricky part: mounting them to the wall. This is where those suspension rails come into play. As the team at Petite Modern Life explained, you’ll need to carefully measure and mark the wall to ensure the cabinets are level and evenly spaced.
But don’t let this task intimidate you. With a stud finder, a level, and a little bit of patience, you’ll have those cabinets securely mounted in no time. Just be sure to keep an eye out for any pesky wires or pipes hiding in the walls before you start drilling.
Once the cabinets are in place, it’s time to add those striking walnut-stained doors. Carefully align them, screw them in, and stand back to admire your handiwork. Doesn’t it already look like something straight out of a high-end furniture showroom?
Crafting the Floating Top
Now, the real magic happens when we add that gorgeous, custom-made wood top. This is where your design vision really comes to life, my friends.
You can choose to use a pre-cut piece from IKEA or head to your local hardware store and have a piece cut to your exact specifications. Just be sure to measure your cabinet dimensions carefully to ensure a perfect fit.
As for the walnut stain, the team at Woodshop Diaries has some great tips. They recommend applying a few thin, even coats, allowing each one to dry fully before moving on to the next. This will help you achieve that rich, uniform color you’re after.
Once the stain has dried, it’s time to attach the top to the cabinets. A few well-placed wood glue and screws should do the trick, but be sure to pre-drill your holes to avoid any pesky cracks or splits.
And the best part? You can choose to let the top overhang the cabinets for a truly floating effect, or you can keep it flush for a more streamlined look. The choice is entirely yours, my friends.
Finishing Touches
Alright, we’re in the home stretch now! With the cabinets mounted, the doors installed, and the stunning walnut-stained top in place, it’s time to add those final touches that will really make your media console shine.
First up, let’s tackle those pesky cords and cables. No one wants to see a tangled mess of wires ruining the clean lines of our beautiful creation. Thankfully, there’s a simple solution: recessed wall cable management boxes.
The team at Petite Modern Life has the perfect hack for this – just drill a hole in the back of the cabinets and run those cables through to the wall-mounted boxes. Voila! Instant cord concealment.
And speaking of that TV, don’t forget to install a sturdy mount that will allow you to tilt, swivel, and adjust the viewing angle to your heart’s content. After all, this media console is meant to be the ultimate entertainment hub, so you’ll want to make sure your television is perfectly positioned.
Finally, the fun part – styling! Arrange your favorite plants, picture frames, or small decorative pieces on the open shelves to really make this media console your own. And don’t be afraid to get creative – mix and match textures, colors, and heights for a truly one-of-a-kind look.
The Finished Product
And there you have it, my friends – your very own modern media console with a show-stopping walnut stain. Take a step back and admire your handiwork. Doesn’t it just take your breath away?
Not only is this piece a stunning addition to your living space, but it’s also a testament to your DIY skills. Imagine the look on your guests’ faces when they realize you crafted this masterpiece yourself. They’ll be begging you to build one for them, I can guarantee it.
But the real joy comes from the sense of accomplishment you’ll feel every time you use your new media console. Whether it’s hiding away your DVD player, charging your devices, or displaying your prized possessions, this piece is sure to become the heart of your living room.
And the best part? You can take this basic design and make it your own. Sofas Spectacular, a custom sofa company in the UK, offers a wide range of wood stains and finishes, allowing you to create a media console that perfectly complements your existing décor.
So, what are you waiting for? Grab your tools, channel your inner woodworking wizard, and let’s get building. Trust me, the satisfaction you’ll feel when you’re done will be well worth the effort.


